Thursday 20 November 2014

Gina's Pizzelle...via Mario Batali

I don't know who Gina is but damn, her recipe for Pizzelle are amazing! They're light and crispy and best of all, they have anise in them, which I love. I first came upon this recipe a couple of years ago on Mario Batali's website. Growing up, I wasn't really a fan of pizzelle but as an adult I LOVE these simple, homemade, classic cookies.


This does require a pizzelle maker, which are readily available and range between $40-$70. Not too bad of an investment. I've been using my moms, who's had hers for 30 years now. I love how seasoned it is. Although the ones they make today are non stick as opposed stainless steel. Just make sure it's really hot when you add the batter.


So last night after dinner when it started snowing, I thought let me make snow flakes to go with the snow flakes falling outside. Lol. They do look like snow flakes, right? Perfect for the holiday season.


Gina's Pizzelle

6 eggs
1 cup sugar
3/4 cup vegetable oil
3 cups flour
1 tablespoon baking powder
3 tablespoons anise seeds

In a large bowl, combine the eggs, sugar, and oil and mix until well combined. Add the flour, baking powder and anise seeds and mix together. Set aside at room temperature for 30 minutes.
Heat the pizzelle iron until very hot. Pour 1 1/2-2 tablespoons of batter onto the iron, close it and cook until golden brown. Repeat until all the batter is used.

m xo

Tuesday 18 November 2014

Butternut Squash Galette

It's still officially fall even though you wouldn't know it by looking outside today. Although, I have to say I love this kind of snow. It looks so pretty coming down, all fluffy and white, but nothing has been really sticking to the ground except on the grass and trees. It totally gets me in the mood for the holidays. Anyways, I digress. It's fall and I love cooking and baking with all the squashes available.

This weekend was my brother in law Chris' 40th birthday (I know, so young) and my sister threw him a little cocktail party for a few friends and family and I made a couple different types of crostini. One of them was butternut squash and ricotta, which was dee-lish. So I had some cubed roasted butternut left over and of course a little ricotta and so I decided to make a galette.


This was super easy to throw together, especially with frozen puff pastry. This galette is a lovely balance of savoury from the ricotta and feta with a hint of sweetness from the squash. It made a wonderful lunch today. And would be amazing for a brunch. I also happen to have some smoked mozzarella left over from the rice balls that I made for the party too, which I put in the galette. And I have to say it's the only thing I would change in the recipe. It was good but was a little too strong for the butternut squash, so next time I'm going to use regular mozzarella.


 I'm going to freeze the leftover galette for the car ride to Montreal this weekend. Yummy!

Butternut Squash Galette

1 sheet of puff pastry, thawed
1 small butternut squash, peeled, cubed, seasoned with salt and pepper and roasted, about 1 1/2 cups cooked
1 cup ricotta
1/3 cup feta, crumbled
1/2 cup mozzarella, cubed or shredded
1 egg
1/4 teaspoon grated nutmeg
1/2 teaspoon salt
1/2 teaspoon pepper
1 egg, lightly beaten, for the egg wash

Preheat oven to 375F.
Line a baking sheet with parchment. Roll out the puff pastry and cut the edges to form a rounded shape. Mix ricotta, feta, mozzarella, 1 egg, nutmeg, salt and pepper. Mound in the middle of the pastry leaving 1 1/2 inch border all the way around. Top with the butternut squash. Pull pastry up and over the edge of the ricotta and butternut squash, leaving the centre open. With a pastry brush, brush the pastry with egg. Bake for 40-45 minutes. Let cool completely before serving.


m xo


Monday 10 November 2014

Lady and Pups, Spicy Sambal Meatballs

Ask, and you shall receive! Well, I asked.

I have been needing new and exciting chicken recipes (I know, my life revolves around chicken recipes. Pretty boring, right?) and look what shows up in my "in box" this morning!  This wonderful recipe for Spicy Sambal Meatballs!!


This recipe comes from a wonderful blog that I follow called Lady and Pups. Her photos of the recipes she creates are stunning! I want to make very single recipe she posts.

This especially caught my eyes because, first of all the meatballs are made with chicken thighs. Second, she poaches eggs in the sauce. And third, the sauce is SPICY!! She also stuffs a crusty baguette with these meatballs and poached eggs. It looked amazing!!

Alas, I did not make subs but we still enjoyed the heck out of them. I had to adapt her recipe a little because she calls for long, Asian, red chili's, which I normally find everywhere but for the life of me could not find this time. I bet it's because this recipe went viral, and they sold out... just kidding! So I subbed in jalapeños. And the sambal sauce called for more fish sauce but I ran out when I used it for the meatballs. If you don't have fish sauce, you can sub all the soy sauce for fish sauce.

The one ingredient she says to try not to sub, is the Thai shrimp paste, so I went out specifically for it. It shouldn't be too hard to find.

Oh, and I also doubled the tomatoes because I was worried the sauce would be too spicy, and in fact was perfect because I think the jalapeños that I used were really hot!!

The next time I make this dish though, I'm definitely making subs.


Spicy Sambal Meatballs

(Original recipe from Lady and Pups)

Lemongrass Chicken Meatballs

5 skinless/boneless chicken thighs
4 stalks lemongrass, soft/white parts only
2 garlic cloves, grated
3 shallots, minced
1 tablespoon ginger, grated
1/4 cup fresh mint, chopped
1/4 cup fresh cilantro, chopped
3 tablespoons fish sauce or 2 tablespoons soy sauce
1/2 teaspoon black pepper

Flash freeze the chicken thigh for 2 hours or until firm. Cut into pieces and grind in a food processor until finely minced.
Trim off the tough ends on both sides of the lemongrass, then cut and mince as finely as you can, otherwise it would be like biting into pieces of wood.
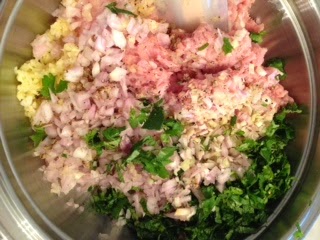
Mix the ground chicken, finely minced lemongrass, shallots, garlic, ginger, mint, cilantro, fish sauce or soy sauce and black pepper.
Shape into balls and bake in oven until lightly browned. At this point you can make these ahead of time and refrigerate until the next day (thats what I did).


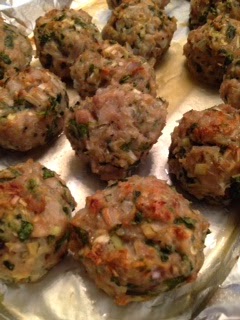
After they were baked


Spicy Pineapple Sambal Sauce

1/2 cup pineapple, fresh or canned
The zest and flesh of 1/2 orange
5 jalapeño peppers, sliced
4 small red chili
7 cloves garlic
1 tablespoon soy sauce
2 teaspoons Thai shrimp paste
4 teaspoons white vinegar
1 1/2 teaspoons brown sugar
1/4 cup olive oil
2 cups canned peeled tomatoes

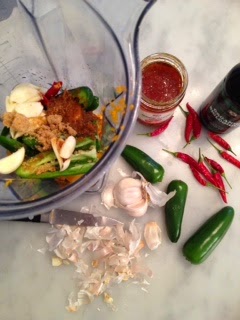
In a blender, puree the orange zest and juice, pineapple, jalapeños, red chili's, garlic, soy sauce, shrimp paste, vinegar, and brown sugar until smooth. Let it run a few minutes. Don't rinse the blender yet.


To Finish

4-6 eggs

To assemble dish:

In a large non stick skillet, heat olive oil over medium-high heat. Brown the partially cooked meatballs until nicely browned on all sides. Remove and set aside.
Add the pineapple/ chili sauce and cook until the mixture is reduced by a 1/3. Puree the tomatoes in the same blender and add to the sauce along with the meatballs. Simmer until the sauce is reduced by 1/3 again.
Make little wells in the skillet to make room for the eggs. Carefully drop the eggs then cover completely and simmer until the whites set and egg yolks are runny. Turn off the heat and serve immediately.


m xo


Wednesday 5 November 2014

Jamie Oliver's Couscous Stuffed Roasted Chicken

Yes I know, another chicken recipe! I have been trying to get creative with chicken because as you may know, my husband is watching what he eats and all he wants every night is chicken. He could just have baked chicken breast EVERY single night and be perfectly ok with it. I, on the other hand, could not! I need variety and am constantly looking for ideas. And then I remembered this whole roasted chicken recipe from Jamie Oliver that I made a few years back, stuffed with couscous. It was delicious!

And whats even better, I got a few meals out it. Caesar salad with chicken, the next night. Lunches for us, the rest of the week. And then I made a beautiful, rich broth with the bones that I'm planning on making a soup with, the end of the week.

The couscous stuffing is so fragrant and delicious in this, that I'm thinking next year for Thanksgiving, I might switch up my usual bread stuffing. It also felt "lighter".

I used a big bird for this, almost 4 pounds, so it look almost 2 hours to cook. Adjust your cooking time to the size of your chicken. And use a thermometer to make sure it is done. The internal temp should be 160F.


Couscous Stuffed Roasted Chicken
Adapted from Jamie Oliver's cookbook, Jamie's Kitchen


1 whole chicken
1 cup couscous, I used whole wheat
Zest and juice of an orange
Zest and juice of a lemon, reserving the lemon halves
2 handfuls of pistachios, or any nut,  roughly chopped
2 handfuls of dried blueberries, or any dried fruit
1 large handful of fresh mint and parsley, plus a little extra to throw on top, roughly chopped
2 tablespoons olive oil, plus more to coat chicken
1 teaspoon fennel seeds
1 teaspoon coriander seeds
1/2 teaspoon cumin seeds
2 cardamon seeds
1 teaspoon black peppercorns
1 teaspoon salt

Preheat oven 375F.
Put your couscous, orange and lemon zest and juice, dried fruit, nuts and fresh herbs in a bowl. Add 2 tablespoons olive oil and half a cup of warm water and mix everything together.
With a mortar and pestle or spice blender, pound all the spices with the salt until you have a powder.
Stuff the bird with the couscous mixture. Block the cavity with lemon halves that you have squeezed the juice from. This will keep the couscous from falling out of the chicken.
Rub the chicken with a little olive oil and all of the spice mixture. Throw on the rest of the fresh herb mixture.
Roast the chicken until a thermometer reads 160F. Let it rest for 10-15 minutes before carving.


m xo

Monday 3 November 2014

Stir Fried Cauliflower Rice

I have been intrigued with this recipe for a while now. It's all over Pinterest. I guess it's the Paleo version of stir fried rice. Instead of using rice for the stir fry, you use grated cauliflower. And since I love fried rice, I decided to give it a try. It's great because it's all vegetables and you cut down on carbs. And goodness knows, I'm always looking for ways to cut calories!!

When I asked my husband how he liked the "stir fry"? He said it was good. He didn't even realize that it wasn't rice. I said it's cauliflower and he said he knew there was some cauliflower in it (because there were little bits of it) , but I told him there was no rice in it what so ever, he really couldn't believe it! And my sister really loved it! So I guess this is a keeper.

The trick to grating the cauliflower in the food processor is not to over crowd it, otherwise it takes a while to grate and then you have mushy cauliflower, which you do NOT want. Just do small batches at time. It really does resemble rice when it is grated properly.

Unfortunately, this the only photo I have...I forgot to take pictures along the way. Sorry.


Stir Fried Cauliflower

I head of cauliflower
2 tablespoons oil
3-4 green onions, diced
1 inch of ginger, finely chopped
2=3 cloves of garlic, minced
1 red pepper, sliced
1 small bunch of kale, thinly sliced
Soy or tamari sauce, to taste
2 teaspoons sesame oil

Coarsely chop the cauliflower into florets. In small batches, pulse the cauliflower in a food processor until it resembles rice. Set aside.
Heat a large pan or wok with oil over medium-high heat and add the green onions, ginger and garlic. Sauté until soft. Turn up heat. Add the red pepper and kale, stirring frequently for 1 minute. Add the cauliflower and soy sauce and continue stirring frequently until the cauliflower is hot and a little crispy. Drizzle with the sesame oil and serve.

m xo